Spatial Calibration |
The spatial calibration tool can convert automatically the pixel values to any other unit of measurement by multiplying the measured values by a conversion factor. Once the spatial calibration is defined, all the position and measurement values in JMicroVision are displayed according to the conversion factor.
When the check box called Scale is activated in the tree (see Display), a scale is displayed at the left bottom on the image. The scale is automatically adjusted when the zoom factor of the main image is modified.
When there is no calibration, all the Tools use the pixel as unit of measurement. Otherwise, the Output unit selected in the combo box (European or Anglo-Saxon unit) defines the unit of measurement.
![]() Note: The spatial
calibration becomes invalid if the image has a vertical resolution different
from the horizontal resolution, or if the image has been distorted or
rescaled with a different horizontal/vertical ratio.
Note: The spatial
calibration becomes invalid if the image has a vertical resolution different
from the horizontal resolution, or if the image has been distorted or
rescaled with a different horizontal/vertical ratio.
![]() Note: Sometimes
you may need to refresh the measurement values to apply the new spatial
calibration or when the output unit is modified, by pressing the Refresh
button (e.g. Data
Viewer) or by reselecting the drawing.
Note: Sometimes
you may need to refresh the measurement values to apply the new spatial
calibration or when the output unit is modified, by pressing the Refresh
button (e.g. Data
Viewer) or by reselecting the drawing.
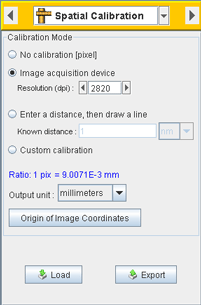
In the calibration tool, there are four modes:
The Load and Export buttons allow loading and saving a spatial calibration, so that it can be reused in another project.
|
|
The Shift Image Origin button opens a dialog which allows to shift the origin of the image. The first panel "Default Image Coordinates" defines a position without any shift. The second panel "New Coordinates" redefines the position entered in the first panel.
![]() Note: The origin
can be located by default at the top or at the bottom left corner of the
image (depends the Y axis direction, see Spatial Calibration
preferences).
Note: The origin
can be located by default at the top or at the bottom left corner of the
image (depends the Y axis direction, see Spatial Calibration
preferences).
To shift the origin, choose a position which has a known reference from the combo box or enter X and Y values in the first panel (the position can be located in the image by pressing the Show Position button). Then, in the second panel, enter X and Y values either in pixels or with a specific unit. When the OK button is pressed, the origin of the default image coordinates is shifted. The origin shift is the X and Y distance of the positions entered in the first and the second panel.
![]() Note: If the new
coordinates are defined with a specific unit (not pixels), the final X
and Y values will be round in pixels (discrete values).
Note: If the new
coordinates are defined with a specific unit (not pixels), the final X
and Y values will be round in pixels (discrete values).
This is the default mode. The conversion factor is set to 1, so the program shows the measurements in pixels without any conversion.
This mode can be used for images acquired by a device like a scanner, by entering the acquisition resolution in dpi.
![]() Note: Some image
acquisition devices write the calibration value in the header of the image
file. When the image is opened in JMicroVision, the calibration is set
automatically (works only with TIFF format).
Note: Some image
acquisition devices write the calibration value in the header of the image
file. When the image is opened in JMicroVision, the calibration is set
automatically (works only with TIFF format).
![]() Note: The calibration
is biased when the image has been rescaled or if there is an optical system
between the device and the specimen (e.g. that magnifies the specimen).
Note: The calibration
is biased when the image has been rescaled or if there is an optical system
between the device and the specimen (e.g. that magnifies the specimen).
Some measurement devices may include a scale in the image, thus providing a reference point for calibrating. Images with an object that has a known distance can also be used.
This mode allows setting a conversion value by drawing a line of known distance on an image. Follow these steps:
This mode allows entering a length that corresponds to the length of one pixel.
Max length of the scale: defines the maximal length (in pixels) of the scale displayed on the main image. The scale length changes when the zoom factor value or the output unit is changed.
Checking the box Keep all the position values in pixels will allow to maintain the position parameters in pixels (see position object descriptors).
Vertical axis (Y) direction: defines the direction
of the Y axis. The default direction is down. In this case, the origin
is located at the top left corner of the image ![]() .
When the direction is up, the origin is at the bottom left corner.
.
When the direction is up, the origin is at the bottom left corner.
![]() Note: To display
the preferences, open the Project
Preferences window
Note: To display
the preferences, open the Project
Preferences window ![]() ,
select Calibration.
,
select Calibration.